


Welcome to the world of home improvement at latbord.lv, where we stand for frugal living, craftsmanship, and fun, creating a cozy, family-friendly environment. This guide is designed especially for the practical person who takes pride in improving their home while keeping functionality and budget in mind, making floor tiles.
Mastering the skills of floor tiling can make a massive difference to the look and feel of your home. Whether you’re embarking on a renovation project, refreshing an outdated room, or constructing a new home, this guide will walk you through the floor-tiling process. Roll up your sleeves, and let’s transform your home together!
Getting started – choosing the right tiles
The path to a beautiful tiled floor starts with choosing the suitable tiles. This choice is about aesthetics and finding the perfect balance between functionality, durability, and style that suits your needs.
Here’s what you need to consider:
- Durability: Assess the hardness of the tiles. Choosing tiles for your floors that can withstand heavy foot traffic without cracking or splitting is very important. Look for tiles with a high PEI (Porcelain Enamel Institute) rating, which indicates their abrasion resistance.
- Water resistance: The water absorption capacity of tiles is a significant factor, for example, in bathrooms and kitchens. For example, porcelain tiles have a lower water absorption coefficient and are more suitable for wet rooms.
- Size and shape: Larger tiles can make a small room appear larger, while rectangular tiles create a unique pattern. Size also affects the installation process – larger tiles may require more cutting and fitting work.
- Texture and slip resistance: In rooms with high exposure to moisture, such as bathrooms, consider tiles with a textured surface for better slip resistance. A matt finish provides better adhesion than a glossy finish.
- Color and style: Light colors can give a room a more spacious look, while darker tones add a cozy feel. Consider the overall style of your home and choose a tile color that complements your décor.
Examples of different rooms:
- Entrance and corridors: porcelain tiles with a higher PEI rating to ensure resistance to outdoor conditions and heavy pedestrian traffic.
- Kitchen: Ceramic tiles – stain-resistant and easy to clean, such as glazed ceramic or porcelain tiles, allowing various design options.
- Bathroom: Non-slip, moisture-resistant tiles. Mosaic tiles can add aesthetic appeal and are practical as they have more prominent grout lines for better adhesion.
- Living areas: Aesthetics should be a key consideration alongside durability. Porcelain or glazed ceramic tiles can replicate the look of natural stone or wood.
Tools and materials – what you’ll need
Successful tile installation requires a well-prepared set of tools for floor tiles. In addition to the basics listed above, here are the additional tools and materials you will need and their importance:
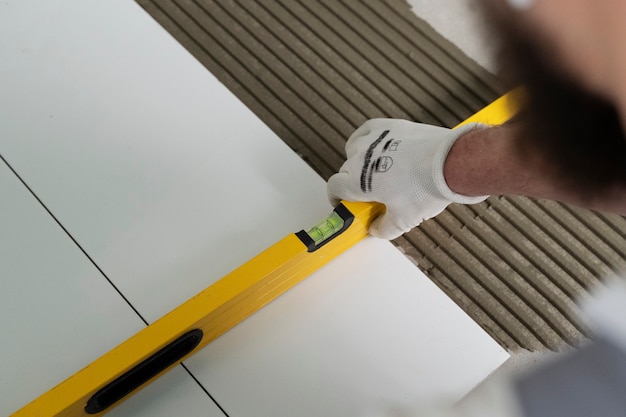
- Chalk line or laser level: Use a chalk line or laser level to ensure the tile rows are straight. This tool is essential to align the tiles correctly from the start.
- Tile patchers: Tile nippers are indispensable for shaping and trimming tiles around obstacles such as pipes or corners.
- Rubber mallet and wooden block: These gently tap tiles into place without breaking them and ensuring a smooth and even surface.
- Grout float: The grout float is used to apply and smooth the grout between the tiles.
- Tile spacers: Tile spacers ensure even tile placement and uniform grout lines. They come in different sizes, so choose one that matches the desired width of the grout lines.
- Mixing paddle and bucket: A mixing paddle and bucket are needed to integrate the adhesive and grout to the correct consistency.
- Knee pads: Invest in a good pair of knee pads for comfort and protection.
- Safety glasses and gloves: To protect your eyes from tile chips, always prioritize safety by wearing safety glasses and gloves to protect your hands.
- Sponge and clean cloths: Remove excess mortar and clean tiles during and after installation.
- Sawed trowel: Different adhesives require different-sized cuts. Use the correct size for your adhesive to ensure proper depth and adhesion.
Choosing the right adhesive and mortar
Choosing the suitable adhesive and grout is as crucial as choosing the right tiles.
- Glue: There are two main types of adhesives – thin grout and mastic. Thin-set mortar suits rooms and floors with high humidity, while mastic mortar is suitable for dry rooms and wall tiles.
- Grout: You can choose between sand or sandless grout. Sanded grout is used for broader grout lines and is more durable, while unsanded grout is more suitable for narrower lines and smoother finishes.
Laying the foundation – preparing the surface
Proper surface preparation is the basis for successful tile installation. Uneven or incorrect surface preparation can lead to the tiles’ cracking, separation, or water damage over time.
Follow these steps to ensure that your surface is ready:
- Cleaning the surface: start by cleaning the surface thoroughly. Remove any dust, debris, paint, or old adhesive that could interfere with the new tiles adhering correctly. A wire brush can be used to remove hard-to-clean residues for concrete floors.
- Check that the tiles are level: Use a long spirit level to check for any dips or bumps in the floor. Uneven floors should be leveled to avoid rough tiling. For concrete floors, grinding can be used to balance the heights. Fill any cracks or holes in the floor with a suitable filler or repair mortar. This step is crucial to prevent future cracking of the tiles.
- Applying a primer: A primer can improve the bond between the tile adhesive and the surface, especially if the substrate is porous, such as concrete or wood. Ensure the primer is compatible with the surface and the adhesive.
- Waterproofing (if necessary): In areas exposed to high humidity, such as bathrooms for basements, apply a waterproofing membrane to prevent water damage. This step is crucial to protect both the structure and the tile installation.
- Plan movement joints: In larger areas, plan movement joints to ensure the tiles expand and contract with temperature changes. They are essential over concrete subfloors and where tiles join other flooring or wall joints.
After filling or leveling, allow sufficient time for the surface to dry completely before laying the tiles. Moisture that gets under the tiles can cause mold to form or weaken the adhesive.
The art of laying tiles – step by step
Tiling is a painstaking process that requires attention to detail. Here is a more comprehensive guide to help you achieve a professional finish.
- Plan your layout: Start by determining the design of your tiles. Find the center of the room and use chalk lines to create a grid. This helps to achieve a symmetrical finish and to identify where the tiles need to be cut to match the edges.
- Mixing the adhesive: Following the manufacturer’s instructions, mix the adhesive to the correct consistency. It should be thick enough to hold its shape but easy to spread. After mixing, let it stand for a few minutes to allow the chemicals to activate.
Apply the adhesive to a small part of the floor tiles using a notched trowel. Hold the trowel at a 45° angle to form grooves to ensure an even adhesive thickness under each tile.
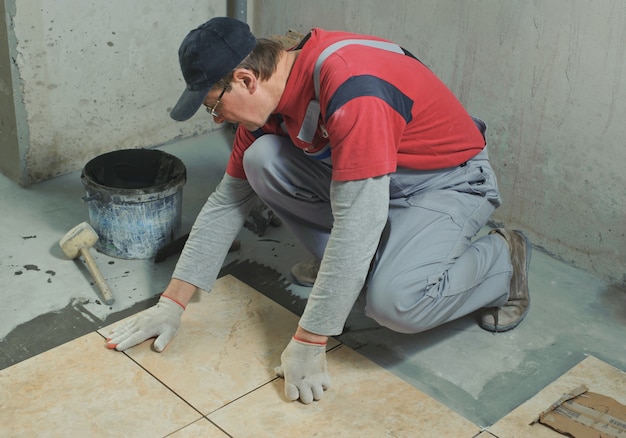
- Laying the first tiles: Insert the first tile firmly into the starting point of the adhesive, rotating it slightly to ensure good adhesion.
- Adding more tiles: Continue laying the tiles, inserting spaces between them to ensure even spacing between tiles. Check regularly with a spirit level to ensure the tiles are even and even.
- Cutting tiles:
- Measure and mark where tiles must be cut to fit edges, corners, and obstacles.
- Use a tile cutter or wet saw for straight cuts and tile nippers for curved cuts.
- Always wear safety goggles when cutting tiles.
- Applying the grout:
- Once the adhesive has set (usually after 24 hours), remove the spacers and prepare the grout.
- Apply the mortar with a rubber float, working it into the gaps between the tiles.
- Move the float diagonally across the tiles to avoid pulling the grout out of the joints.
- Cleaning: Wipe excess grout from the surface of the tiles with a damp sponge. Rinse the sponge frequently in clean water to avoid clouding the grout joints.
- Grout sealing: After the grout has dried (see manufacturer’s instructions for drying time), apply grout sealer. This helps to protect the grout from stains and moisture.
- Finishing touches: After everything has dried, do a final clean. Check for any remaining mist on the tiles and clean them with a suitable cleaning agent. You may also need to apply a sealant to the edges where the tiles come into contact with walls or other surfaces.
Building pride and comfort
Starting the journey by laying your floor tiles is more than a home improvement project. It’s a step towards creating a space that suits your style and practicality.
The skills you learn and the effort you put in provide much more than the instant gratification of a job well done. It is a commitment to creating a comfortable and pleasant environment for your family while respecting the principles of economy and thrift.
As you step back and admire your work, remember that this newly acquired skill is valuable to your DIY repertoire, combining functionality with artistic expression. You have turned your vision into reality, and in doing so, you have improved the floors you walk on and the essence of your home.